Why did I do this article?
I made this article because I find many articles available on medium and on internet allowing me to solve many problems. Nevertheless when I wanted to use the AWS stack for a personal project. I couldn’t find an easy way to communicate with AWS IoT with a Cognito authenticated user with his own MQTT topic. That’s why today, I propose the solution I found with a simple example hoping to help people facing the same problem as me.
Use Case
This short guide can be useful if you are building a SaaS application with AWS IoT as an MQTT broker and want your user to have his personal MQTT topic.

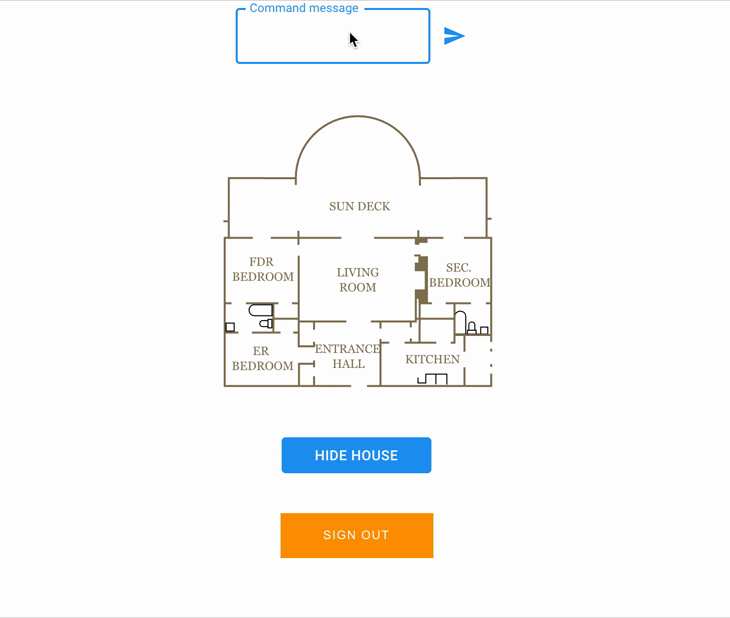
To illustrate my point, I made a small use cases, of a user who would like to control his house from a web interface, the house will be represented by a SVG plan that will be updated when commands are published in MQTT brokers.
Setup
In this article I will use React and the amplify library, the goal is not to learn how to use React, I invite you to take the sources directly or to follow the instructions directly on your own project regardless of the framework used, amplify can be used on the different JS framework that exists.
If you want to follow the whole tutorial, you can download source here : https://github.com/alexisgardin/aws-iot-house-management-medium
Once you download the project run these two command :
npm install
npm start
The application is now available at : http://localhost:3000/
(note : you had to configure app before usage, just follow the tutorial)
AWS CLI is also highly recommended.
Authentication with a Cognito User Pool
As i said, i use the amplify library but i doesn’t use the amplify cli because this make too much magic for me. I like to understand what happen so we will create auth via the AWS Console. The documentation for Amplify Framework is available here : https://docs.amplify.aws/
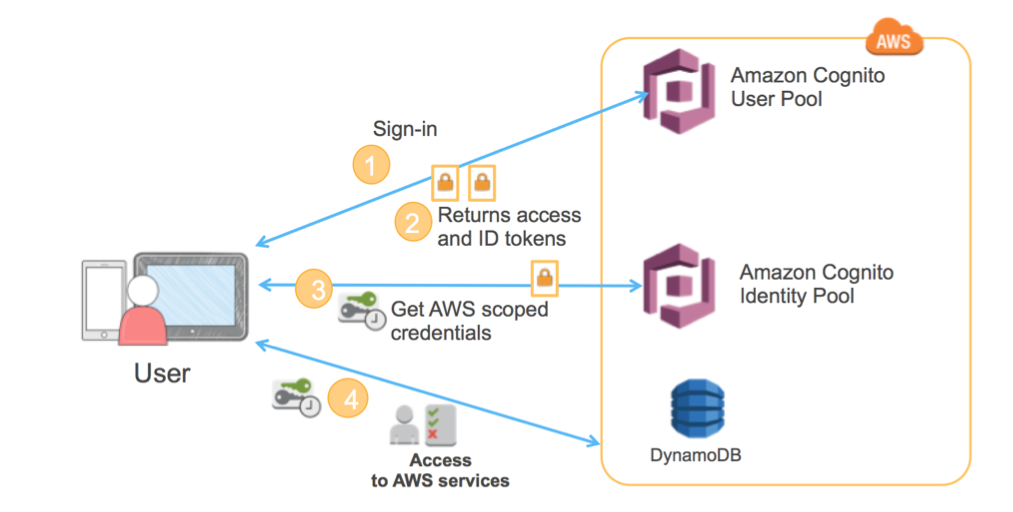
We are going to use Cognito as identity provider, you can quickly see how the authentication with Cognito will work in our case with the image below.
Create a Cognito UserPool
A user pool is a user directory in Amazon Cognito. With a user pool, your users can sign in to your web or mobile app through Amazon Cognito. Your users can also sign in through social identity providers like Google, Facebook, Amazon, or Apple, and through SAML identity providers.
https://docs.aws.amazon.com/cognito/latest/developerguide/cognito-user-identity-pools.html
You had to create a Cognito UserPool in order to manage your users. This will allow your user to sign up and access to the AWS Ressources like your MQTT Broker thanks to Amazon Cognito Identity Pools.

You can choose review default and add an App client and then uncheck generate client secret like the screen below and let the default settings.

Create an Amazon Cognito Identity Pools
Amazon Cognito identity pools (federated identities) enable you to create unique identities for your users and federate them with identity providers. With an identity pool, you can obtain temporary, limited-privilege AWS credentials to access other AWS services.
https://docs.aws.amazon.com/cognito/latest/developerguide/cognito-identity.html
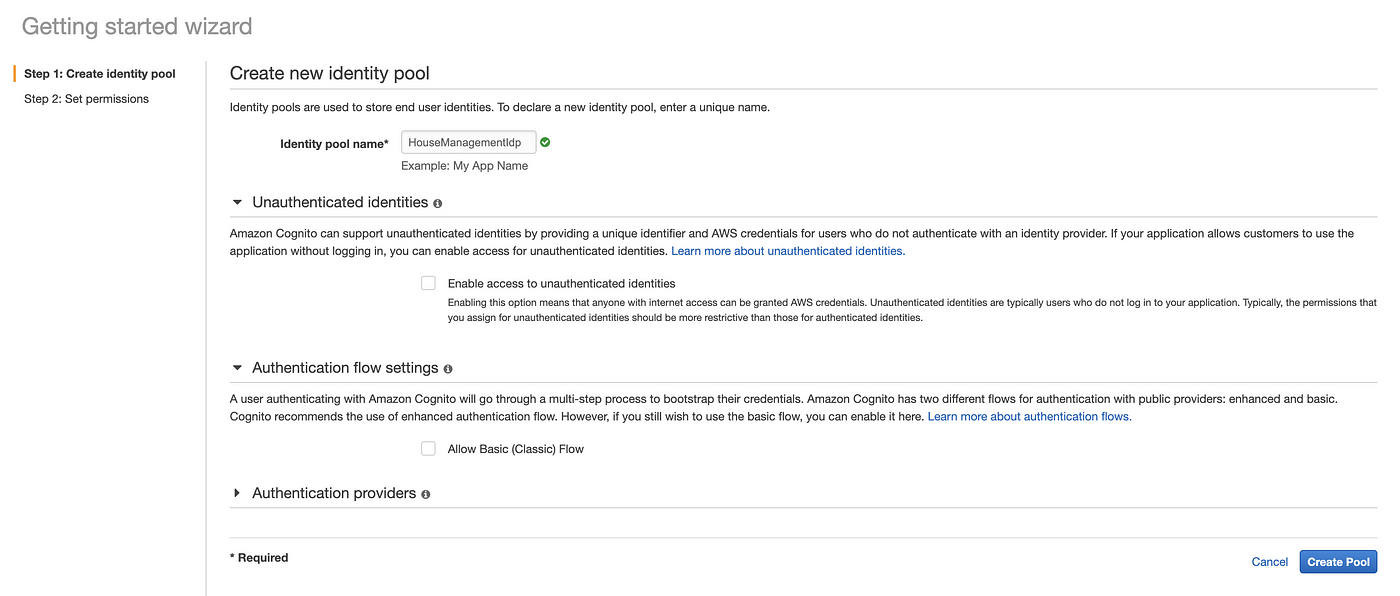
In Cognito you can create Identity Pools which will be needed in order to access to the MQTT Broker. In the case of private access to AWS Resources do not check Unauthenticated identities this is all the interest of this guide.
In the authentication part, you will need the AppClientId in the App client settings section of your UserPool you just created and the UserPoolId you will find on the UserPool homepage.
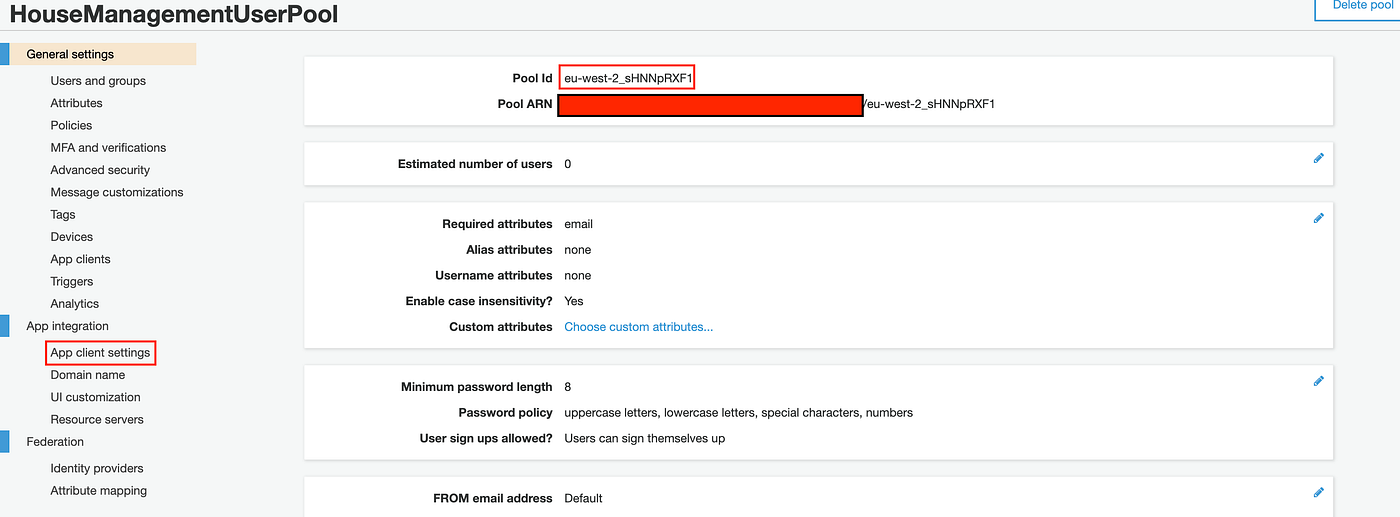
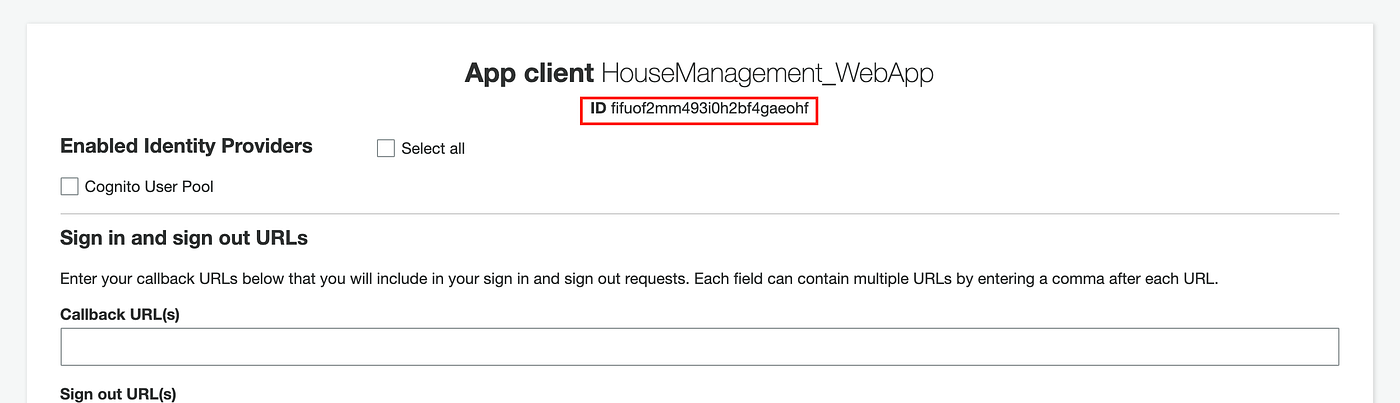
Keep these two value for later we will need these value for the webapp configuration.
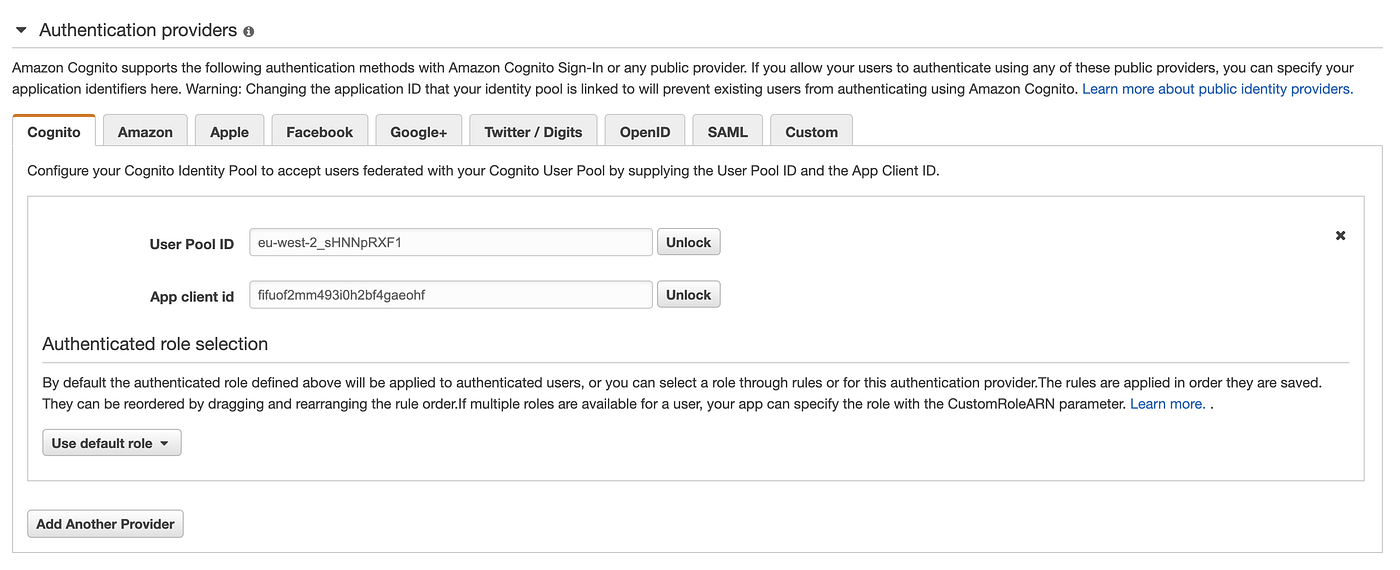
You can now create your identity pool like i do above and leave the default roles that we will modify later and then create your identity pool. The last value needed is the IdentityPoolsId, you can have it by executing the AWS CLI command below or in url when you are in amazon console in your federated identity management section of your Identity Pool.
aws cognito-identity list-identity-pools --max-results 20

result of cognito list-identity-pools command
Enable the authentication of the HouseManagementApp
In the HouseManagementApp source, you will find a ./src/aws-exports.js which is the necessary configuration needed by amplify in order to connect to your UserPool
const awsExports = {
  "Auth": {
    "identityPoolId": 'YOUR-IDENTITY-POOL-ID',
    "region": 'YOUR-REGION',
    "userPoolId": 'YOUR-USERPOOL-ID',
    "userPoolWebClientId": 'YOUR-APPID',
    },
  };
Once it’s done, launch the ReactApp with npm start and you can now connect and create an account on http://localhost:3000/.
Manage Policy
In order to communicate with the MQTT broker of AWS IoT you had to define a Policy, which allow your user to communicate with it, you will need your AccountId and your region (eu-west-2 for me) where you want to deploy your app for me.
You can get your account ID with this command or in profile section of AWS console.
aws sts get-caller-identity
This Policy below will be used for two things your AuthRole and for IoT Core in order to allow user to Connect, Publish and Subscribe to your MQTT broker.
{
    "Version": "2012-10-17",
    "Statement": [
        {
            "Action": [
                "iot:Connect"
            ],
            "Resource": [
                "arn:aws:iot:eu-west-2:**<ACCOUNT_ID>**:client/${cognito-identity.amazonaws.com:sub}"
            ],
            "Effect": "Allow"
        },
        {
            "Action": [
                "iot:Publish"
            ],
            "Resource": [
                "arn:aws:iot:eu-west-2:**<ACCOUNT_ID>**:topic/${cognito-identity.amazonaws.com:sub}"
            ],
            "Effect": "Allow"
        },
        {
            "Action": [
                "iot:Subscribe"
            ],
            "Resource": [
                "arn:aws:iot:eu-west-2:**<ACCOUNT_ID>**:topicfilter/${cognito-identity.amazonaws.com:sub}/*"
            ],
            "Effect": "Allow"
        },
        {
            "Action": [
                "iot:Receive"
            ],
            "Resource": [
                "arn:aws:iot:eu-west-2:**<ACCOUNT_ID>**:topic/${cognito-identity.amazonaws.com:sub}/house"
            ],
            "Effect": "Allow"
        }
    ]
}
You can find more explanation of every policy action here : https://docs.aws.amazon.com/iot/latest/developerguide/iot-policy-actions.html
Add policy to IoT Core
In AWS IoT Core you can go to Security > Policies and then create a new policy and enable advanced mode for copy and past the policy, don’t forget to add AccountId.

IAM Policy for Authenticated User
Same things for the Authenticated Role, Go to IAM and create a new Policy for your roles and copy and paste the same policy.

Attach Policy to your user
The last action you need to do is to attach the IoT policy to your Cognito User, In order to retrieve the Cognito Identity Id you can use Amplify (it’s already displayed if you use the HouseManagementApp).

This code use amplify to allow you to retrieve your current user identityId
Auth.currentCredentials().then(user => { console.log(user.identityId);
});
Then you have to use aws cli in order to attach the policy.
aws iot attach-principal-policy --policy-name 'HouseManagementIoT' --principal ''

Subscribe and Publish with Amplify
During the last part if you get an error similar to this : errorCode: 8, errorMessage: AMQJS0008I Socket closed. Check that all steps of management policy are done.
https://docs.amplify.aws/lib/pubsub/getting-started/q/platform/js#create-iam-policies-for-aws-iot
Configure Amplify for your Broker
The code above used in ./src/HouseManagement.js configure the connection information for amplify in order to connect to the MQTT Broker with websocket.
Auth.currentCredentials().then(user => {
  Amplify.addPluggable(
    new AWSIoTProvider({
      aws_pubsub_region: "eu-west-2",
      aws_pubsub_endpoint:
      "wss://-ats.iot.eu-west-2.amazonaws.com/mqtt",
      clientId: user.identityId
    })
  );
});
You can see we use our user identityId for clientId because we specify in policy that only authenticated user can connect to the broker. You also need your Pub/Sub endpoint to establish the connection between your client and the broker. Use this command to retrieve your IoT endpoint.
aws iot describe-endpoint
This command will give you the endpoint address, don’t forget to add the
“-ats” because without the ats you will get a certificate error. You can now change it in ./src/HouseManagement.js
Subscribe with Amplify
PubSub.subscribe(user.identityId+'/house').subscribe(v => {

  console.log(v.value.message);

});
The code for subscribing is pretty simple, like the connection we use the user IdentityId as mqtt topics then we add “/house” because we set this topic in the receive action when we create the policies. He is already present in ./src/HouseManagement.js. In AWS console, you can test it in AWS IoT Core in the “test” section that allows you to publish messages or subscribe on the MQTT Broker.
Available command : on / off.
Available rooms : sundeck, fdr_bedroom, er_bedroom, entrance_hall, kitchen, sec_bedroom, living_room.
Publish with Amplify
PubSub.publish(this.user.identityId+'/house', {'message': this.state.command});
The code to publish is just as simple as the subscription code, you put the right topic to publish, for us CognitoIdentityId + ‘/house’. The code is available in the file ./src/HouseManagement.js in the onClick() function.